Lifecycles
Each Item Type can have an associated Lifecycle. Gnosis Lifecycles are State Machines that describe the possible States (or status) for the Item Type. Item Types can share the same Lifecycle, and many Item Types do not have or need a Lifecycle.
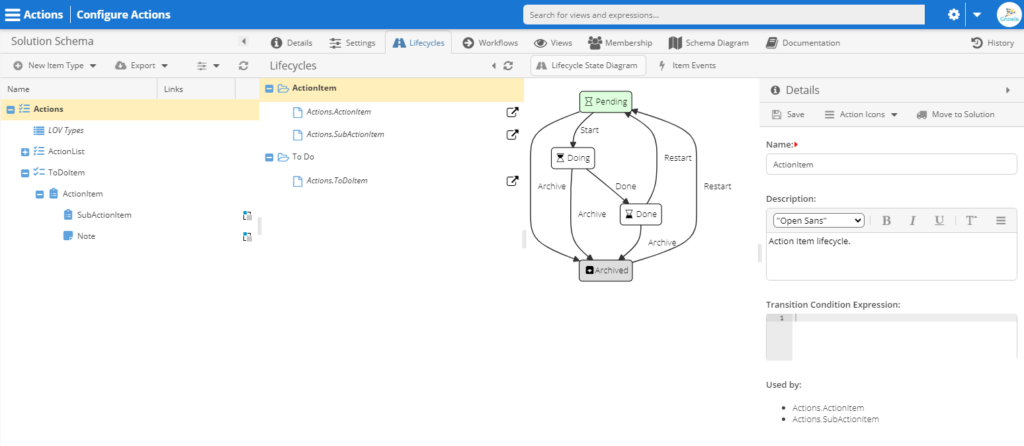
Lifecycle Details
Name—The Lifecycle Name. The Name can contain only letters, digits, and underscore symbols, starting with a letter or underscore.
Description—A description that can contain markup.
Transition Condition Expression—Gnosis Script to deyn transitions.
Action Icons—Configure the State Transitions as menu items and action icons in the Gnosis no-code App.
Move to Solution—Relocate the Lifecycle to a different Solution.
Change Lifecycle—Select a different Lifecycle for the Item Type.
Clone Lifecycle—Clone and set the Lifecycle for the Item Type.
Lifecycle State Diagram—The Lifecycle state machine diagram connecting the states.
Lifecycle States
Lifecycles have at least two States that describe an Item’s status. The Lifecycle must have a Start State and may have an optional Archive State.
The Start State is the initial status of an Item when it is created.
Items in the Archive State are excluded from queries unless explicitly requested. The Archive State is essentially a soft delete in that the Item still exists in the database but is not visible to most users.
Items are Promoted from one State to the next, and only Users granted Permission by Identity Membership are allowed to Promote Items to the next State.
State Transitions
State Transitions connect Lifecycle States.
State Transition Details
Transition Label—A label for the State Transition. The Name can contain only letters, digits, and underscore symbols, starting with a letter or underscore.
Description—A description that can contain markup. The description value is shown as a confirmation box in the Gnosis no-code App, allowing the user to cancel.
Transition Condition Expression—Gnosis Script to deyn transitions.
State Transition Permissions
State Transition Permissions grant Identities the ability to Promote items to the State. Drag the Identity from the Permission tab onto the Pemermissions tree.
State Transition Events
State Transition Events allow any Application Logic to be performed before and after the Transition by invoking a Workflow.
On Before
When an Item is Promoted, an On Before Event is triggered. If the Workflow throws an error, the Transition is canceled, and the Item remains in its current State.
On After
The On After Event is triggered after the Lifecycle State Transition. If the Workflow throws an error, the Transition is not canceled, and the Item remains in the new State.
Item Events
Item Events trigger Workflow when an Item is created, changed, promoted, or deleted.
Tree View—A tree view of the Item Events.
Diagram View—A diagram view of the Item Events.
On Item Create
When an Item is created, the On Item Created Event is triggered. If the Workflow throws an error, the Item is not created.
On Item Change
When an Item is updated, the On Item Changed Event is triggered. If the Workflow throws an error, the Item is not updated.
On Item Delete
When an Item is deleted, the On Item Deleted Event is triggered. If the Workflow throws an error, the Item is not deleted.
On Item Promote
When an Item is promoted, the On Item Promoted Event is triggered. It is called after the “On Before” State Transition Event and before the “On After” Event. If the Workflow throws an error, the Item is not promoted.
Lifecycle Design Guidance
Lifecycles define an item’s possible states at any given moment. This section describes the recommended approach to designing your Item Type Lifecycle.
Step One: Define your States
The first step is to create all the States for the Lifecycle. This is not a requirement, but it is sometimes the most productive way to think about and design the Lifecycle.
When naming and labeling the State, use the present tense as the State Name and the verb as the State Label. For example, the State Name would be “Running,” and the Label would be “Run.”
Step Two: Add the State Transitions
The next step is to link the States together, adding the State Transitions.
Step Three: Define State View Permissions
Review each State and define the Identities with Read and Update Permissions. As necessary, create additional views that are uniquely suited to the identities.
Step Four: Define State Transition Permissions
Review each Transition and define the Identities that will have Transition Permissions. Alternatively, set the Transition Expression, and when the conditions are met, the Item will automatically Transition into the State. The Transition Priority will direct the Transition if more than one Expression is considered valid.
If the Transition has Identity Permission, it cannot be automated, and a Member of the Identity must explicitly call the service to perform the Transaction. However, if there is also an Expression, the Expression must also be valid for the Identity to be allowed to perform the Transition.
Step Five: Add State Transition Workflows
Next, define Workflow as required on the Transition to perform any necessary business processing. Send notifications, perform calculations, interface, and integrate with other systems.